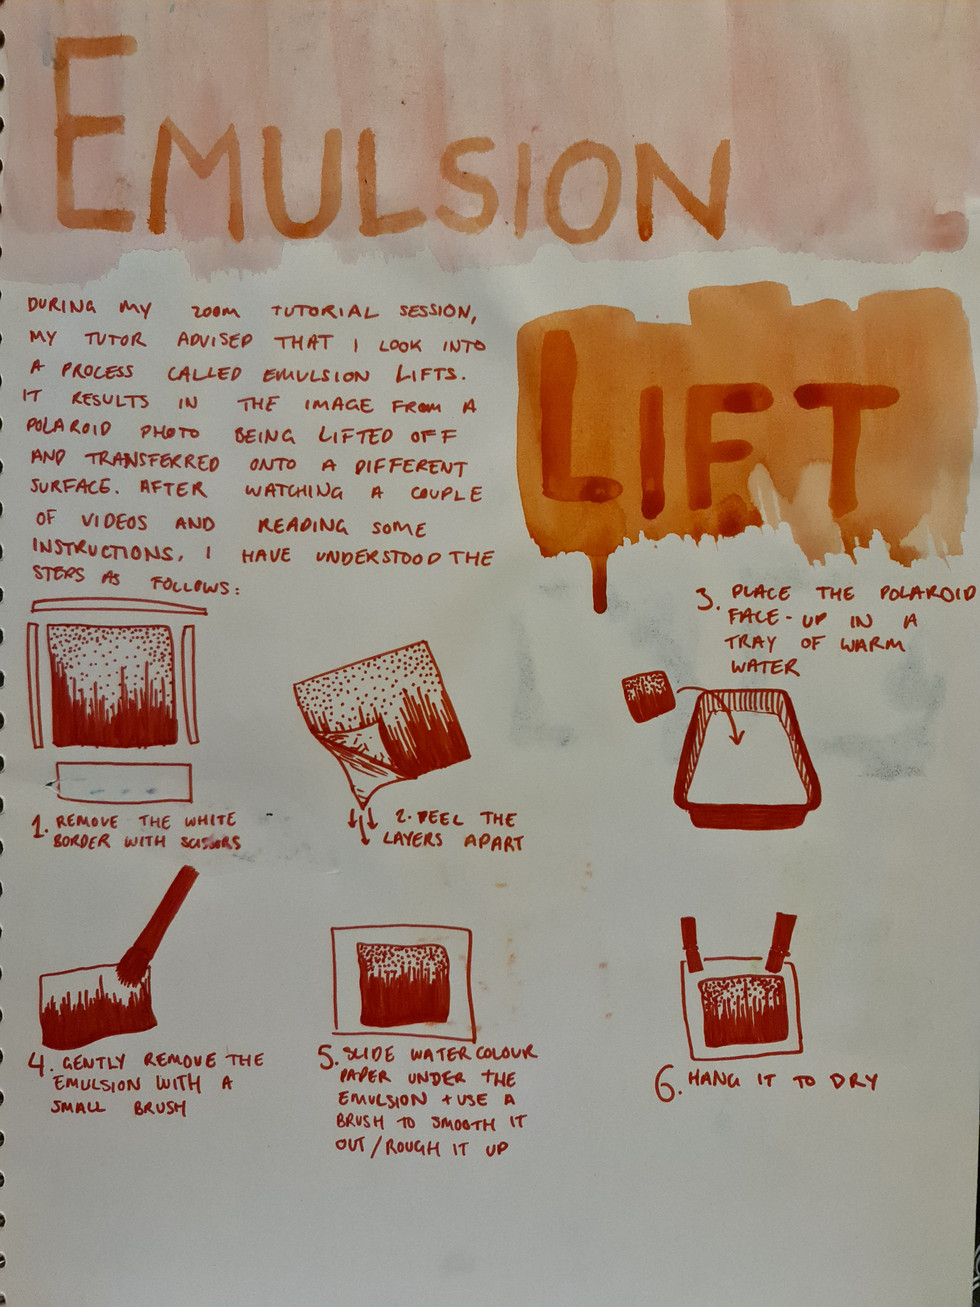
Polaroid Emulsion Lifts
- Mar 18, 2021
- 4 min read
Updated: Mar 20, 2021
So as it turns out, Nicola Muirhead used a different type of film to the Colour 600 film I used, so bleaching the frames won't do the same thing as hers because there's a layer of plastic blocking the chemicals from the gelatine, which holds the actual image. Instead, Maddy suggested I try emulsion lifts. Here's the process as I wrote it when I first tried it last year:

Here's what it looked like when I peeled apart the layers. I like how you can kind of see the silhouette of the subject, although it's very subtle.


I then took the piece on the right and submerged it in a tray of warm water. The edges started to lift up and I let it sit for a few minutes.
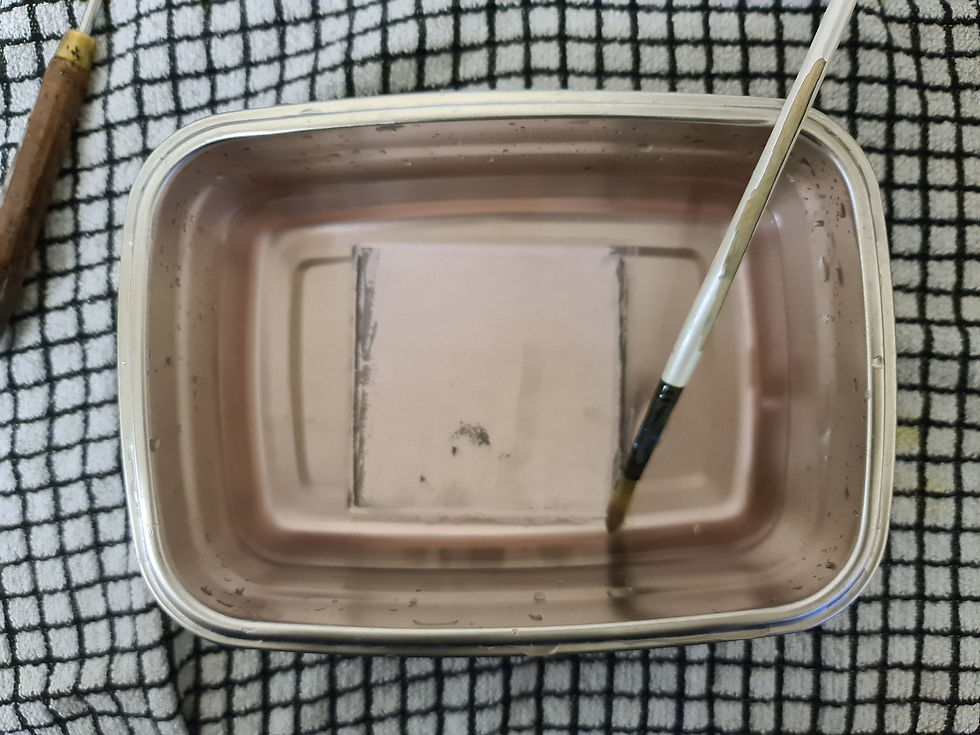
I used a soft watercolour paintbrush to encourage the edges to lift, and I held down the bottom of the frame with a palette knife. I found that as the emulsion started to lift more and more, the water got a weird pink hue, so I replaced it with fresh warm water. I think the added heat helped to lift the emulsion further.

At this stage I decided to let it sit for 5 minutes, and then I went back to it.

Eventually, the whole thing lifted, and it was very difficult to move around without tearing. I removed the plastic that it just came off and I cut some 300gsm watercolour paper so it was slightly smaller than the tray, then I tried to slide it under the Polaroid lift. When I tried to put it in the tray, the emulsion seemed to want to stick to it, so I ran the paper under the tap for a little while. This helped a lot, but it still took me another 15 minutes to get the emulsion to lie flat (ish) on the paper, and then it was a struggle trying to remove the paper from the tray with all the water, so I poured it out and hoped for the best. Here's what it looked like after drying between two paper towels under a book overnight:

After this piece, I decided I wanted to experiment with the technique more, and see if there are any other surfaces I could transfer the emulsion onto.


I used exactly the same process, but the water was warmer this time which made separating the emulsion and plastic a whole lot easier. I also cut out the frames instead of peeling the image away from the white border, but I think I prefer leaving the edges in. I tried to transfer the first emulsion onto a spare photo I had left over from the antihero project, but the paper was too thin and flimsy so the emulsion didn't adhere. I decided to slap it on the door to remind me of my failures.


I actually think it looks pretty cool, as most of the colour ink bled out into the water and there's also a sort of marbled effect in the negative space. Maybe I'll revisit this accident another time.
I moved on to cartridge paper, and this was really successful. The paper was easier to get in the water and was way more flexible, meaning I could shimmy it under the floating emulsion in the tray.


I did it with cartridge paper again, but this time I let Amrith doodle on it first because I wanted to see if it would show through. Unfortunately, because I dried the lifts between paper towels, the emulsion actually stuck to the paper towel and not the paper. I'm pretty disappointed with this, but I can try again. I found that if I held up the paper towel to light, you could still see the image. This could be something to explore further.


After that, I took a piece of cardboard from the recycling bin and did the same thing. Again, the emulsion stuck to the paper towel instead of the cardboard. If I do this again, I'll have to dry the transfers on a rack or hang them up somewhere, then press them flat between something less porous like plastic.


In my 1:1, Maddy suggested that I experiment with chemical processes and burning after the emulsion lift, so I used sanitiser, thick bleach, spray bleach, fairy liquid, and I let them sit for 5 minutes. Here's my setup:


Below is what they looked like after 5 minutes. There wasn't much change at all.


I left them for another 5 minutes and noticed a very slight green tinge on the section with thick bleach, so I decided to reapply the chemicals.


Here's what they looked like after another 5 minutes.


Again, not much has changed, apart from a slight tinge from the thick bleach. I think that thick bleach may be the only chemical that actually effects the Polaroids, so I'm going to rinse the second emulsion lift, let it dry on a rack, and leave it brushed with thick bleach.
Here's what the emulsion lift looked like after drying:


There was a bit of difference in texture between the fairy liquid and sanitiser sections, as well as a tiny colour change, but nothing major. Here's what it looked like immediately after brushing on the bleach:


Here's what it looked like after 10 minutes:


After another 10 minutes, I decided to pour some more (watered-down) bleach on the emulsion. Here's what it looked like after 10 minutes:


And here's what it looked like after another 10 minutes:


I really like the way this looks, and it really reminds me of Muirhead's work. I want to experiment with this further, so I'm definitely keeping this in mind for later on in the project. I'd like to do it with a Polaroid of my family photos, and I even have a Polaroid of my great grandfather, but I obviously wont mess with that because important to my family. After experimenting with emulsion lifts and bleaching, I decided to burn one of the polaroids. It looks really cool, but I'm not sure if it's something I want to include in my outcome.


Comments